Checkout
Ring up a sale: add items, attach a customer, apply discounts, take cash, QR or gift card payments, add delivery, save tickets and send a payment link.
Checkout is the register. You add items to the cart, then tap Charge to take the money. This page shows every part of a sale, from the first item to the receipt.
On a phone, the cart opens from the Cart button at the bottom. On a tablet or computer, the cart (Current sale) is always on the right.
#Library and keypad
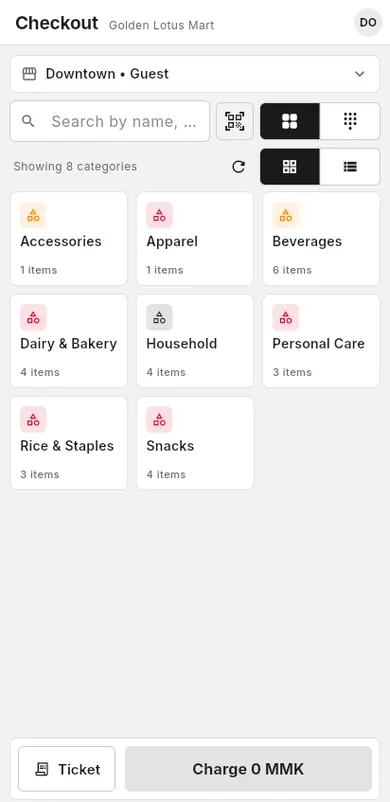
The top of Checkout has two tabs. Library shows your items by category. Keypad lets you type an amount for something that is not in your item list. On phones the two tabs are small icons next to the search box.
When to use: Library for normal items; Keypad for a quick custom amount, like a service fee.
Sell from the library
- Tap Library.
- Tap a category to open it (a tile, or its chip in the row above the items).
- Tap an item to add it to the cart. Tap again to add one more.
- If the item has sizes or colours, pick one in Select variant.
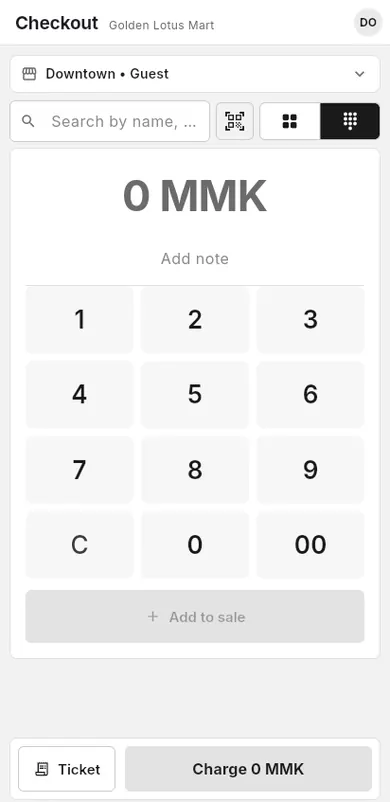
Sell a custom amount
- Tap Keypad.
- Type the amount.
- Optional: tap Add note and type what it is for.
- Tap Add to sale. The line shows as Custom amount (or your note).
#Search and scan
Find an item by typing, or scan its barcode with the camera.
When to use: when you have many items, or the item has a barcode.
Search
- Tap the search box (Find item).
- Type part of the name, the SKU or the barcode number.
- Tap the item in the list.
A search looks through all your items, even when a category is open. The line above the list says how many it found in all items.
Scan with the camera
- Tap the scan button next to the search box (Scan barcode).
- Allow the camera if the phone asks.
- Point the camera at the barcode. The item goes into the cart.
- Scan the next item. The camera stays open.
- Tap Close scanner when you are done.
Scanning a phone's IMEI into the search box adds the item with that serial: see Sell with a serial number.
#Pick items fast
Checkout has shortcuts so a sale takes fewer taps.
When to use: every day, for the items you sell most.
Pages and categories
The row of chips above the items is your quick menu: Favourites, Top sellers, All, then each category with how many items it has. Tap a chip to open it. Checkout remembers the last category on this register.
- Favourites: the items you chose, in your order, with big tiles.
- Top sellers: the shop's best sellers of the last 30 days.
- All: your categories, as before.
Choose favourites
Owners and managers choose the favourites. Cashiers use them.
- Long-press an item.
- Tap Add to favourites.
- To change the order, open Favourites and tap Edit. Drag the rows, then tap Save.
- Pick All shops or This shop only at the top of the editor.
Quantity before the item
- Tap × and type the quantity, for example 3.
- Tap or scan the item. Three go into the cart at once.
You can also type 3* in Find item before you scan, or press a number key on a computer keyboard.
On a tile that is already in the cart, tap − or +. Long-press a tile to type the quantity on a number pad.
Undo
After an item goes in, a message says Added … above the Charge button. Tap Undo if it was a mistake.
Faster search
- Results show while you type. Small typos still find the item.
- Press Enter to add the first result. Turn this off in Settings → POS & inventory → Enter adds top result.
- Your recent searches show when you tap the empty search box.
- Items with sizes or colours open big buttons. The one you picked last time comes first.
Keyboard and scanner
- / goes to Find item. Esc clears it.
- A USB or Bluetooth barcode scanner works anywhere on the page. You do not need to tap the search box first.
Settings for this device
In Settings → POS & inventory you can turn on or off Show Favourites first and Show Top sellers, and pick the Item tile size (S, M or L).
#The cart
The cart lists what the customer is buying, the savings and the total.
When to use: to check the sale, change a quantity, or remove a line before you charge.
- On a phone, tap Cart at the bottom. On a bigger screen, look at Current sale on the right.
- Tap + or − on a line to change the quantity.
- Tap a line to open it. You can change Quantity, or remove the line with Remove.
- Tap Summary details to see the subtotal, discounts, tax and total.
- Tap Charge to take payment.
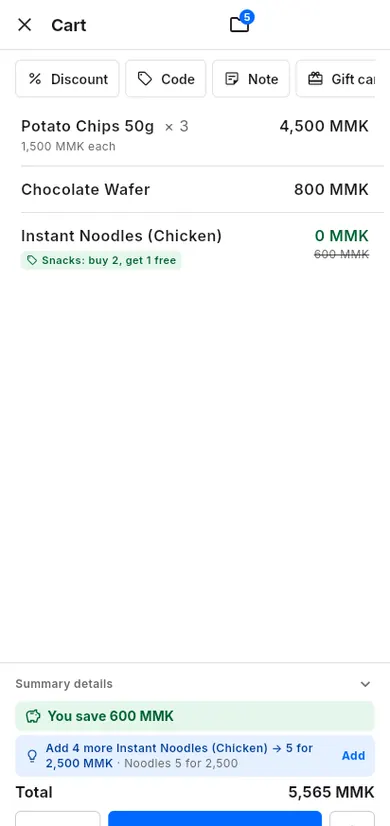
The cart also has these buttons: Discount, Code, Note and Gift card. On a bigger screen they are in the More (⋮) menu as Add discount, Apply code or coupon, Add note and Sell gift card.
To empty the cart, tap Clear (phone) or ⋮ → Clear sale.
#Discounts, codes and coupons
Promotions that you set up apply by themselves when the cart qualifies. You can also type a promotion code or coupon, or give a manual discount.
When to use: when the customer has a code or coupon, or the owner allows a discount.
Enter a code or coupon
- In the cart, tap Code (or ⋮ → Apply code or coupon).
- Type the code.
- Tap Apply.
You can also enter codes on the charge screen under Codes & coupons.
Give a manual discount
- In the cart, tap Discount (or ⋮ → Add discount).
- Choose % or the money amount.
- Type the discount, or tap a preset.
- Tap Apply.
If a code does not work, the app says why, for example This code has expired. or The minimum spend is not reached yet. See Discounts and Stacking rules.
#Attach a customer
Add the customer to the sale to give loyalty points, use their membership discount, store credit or points, and fill in their delivery address.
When to use: for regular customers, members, and any delivery order.
- At the top of Checkout, tap Shop & customer (on phones it shows like "Downtown • Guest").
- Tap Customer.
- In Select Customer, type the name or phone number.
- Tap the customer.
To add someone new, tap Add new customer, fill in the details and save. To remove the customer from the sale, choose Guest (walk-in).
#Split payment
Split lets the customer pay with more than one method, for example part cash and part QR.
When to use: when one payment does not cover the whole total.
- Tap Charge.
- Under Payment, tap Split.
- Pick the first method, for example Cash.
- Type the Amount for this part.
- Tap Add payment.
- Pick the next method and enter its amount. Repeat until Remaining is 0.
- Tap Charge.
To go back to one method, tap Single payment.
#Cash
When to use: the customer pays with notes.
- Tap Charge.
- Tap Cash.
- Type the money the customer gave in Cash received, or tap a quick amount button.
- Check Change and give the change.
- Tap Charge.
After the sale, the Receipt preview opens. You can print or share the receipt from there. See Receipts.
#QR payment
The customer scans your shop's QR code with their banking or wallet app and pays.
When to use: the customer wants to pay by phone.
- Tap Charge.
- Tap QR Payment.
- If you have more than one QR, tap the right one.
- Show the QR to the customer. Tap Show full screen to make it bigger.
- The customer scans and pays.
- Do the two checks in QR photo check.
- Tap Customer paid.
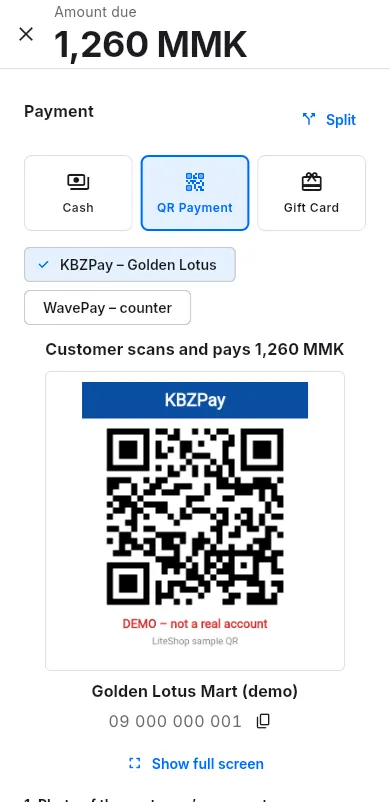
If you see No QR code set up yet, the owner adds the shop's QR codes in Settings → Payments. See QR codes.
#QR photo check
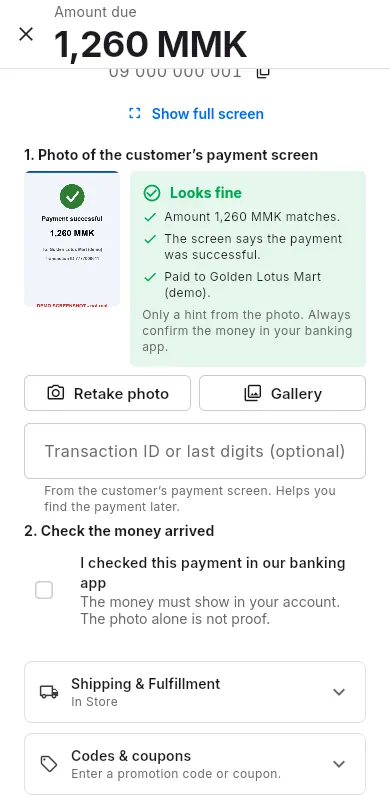
Before a QR sale can finish, you must take a photo of the customer's payment screen and confirm the money in your own banking app.
When to use: every QR payment.
- Under 1. Photo of the customer's payment screen, tap Take photo (or Gallery).
- Take a clear photo of the "Successful" screen on the customer's phone.
- Wait a moment. The app shows a hint, for example Looks fine or Warning – check carefully.
- Optional: type the Transaction ID or last digits.
- Open your banking app and check that the money really arrived.
- Under 2. Check the money arrived, tick I checked this payment in our banking app.
- Tap Customer paid.
See also Check payments.
#Gift card
A gift card is a prepaid card with a number. You can sell one, and customers can pay with one.
When to use: a customer buys a gift card, or pays with a gift card.
Pay with a gift card
- Tap Charge.
- Tap Gift Card.
- Type the Gift card number.
- Tap Check balance. The app shows the Available amount.
- If the card does not cover everything, use Split and pay the rest another way.
- Tap Charge.
Sell or reload a gift card
- In the cart, tap Gift card (or ⋮ → Sell gift card).
- Type or scan a card number, or tap the new number button to make one.
- Type the Amount.
- Tap Add to sale, then charge as usual.
#Tips
The charge screen can show tip buttons.
When to use: if your shop accepts tips.
- Tap Charge.
- Under Tip, tap No tip, a percent, or Custom.
- For Custom, type the Tip amount.
- Take the payment as usual. The tip is added to the total.
#Delivery and pickup
Each sale is In Store, Delivery or Pickup. Delivery adds an address and a shipping fee.
When to use: when the customer does not take the goods now.
- Tap Charge.
- Open Shipping & Fulfillment.
- Tap Delivery or Pickup.
- For delivery: type the Shipping Address, then pick the Delivery area (city and township).
- Check the Shipping Fee. It fills in from your delivery zones. You can change it, or tap Use zone fee to go back.
- For pickup: pick the Pickup Store and tap Select pickup time.
- Take the payment as usual.
If you attached a customer with an address, the address fills in by itself.
#Cash on delivery by a courier
When a delivery company collects the money at the customer's door and pays you back later, choose COD (courier) on the charge screen.
- Tap Charge, then under Shipping & Fulfillment tap Delivery and fill in the address.
- Tap COD (courier) and pick the Delivery company that collects the cash.
- Check the delivery fee and the COD fee (added to the total), then tap Charge.
For a deposit, take part of the money first (cash or QR) and choose COD (courier) for the rest. COD (courier) shows once a delivery company collects cash on delivery for you — see Courier cash on delivery.
#Open tickets
A ticket is a saved cart. Use it to keep an order open while the customer keeps shopping, or to serve many customers at once. Tickets are shared with the other registers of the shop.
When to use: a table, a phone order, or a customer who will come back to pay.
Save a ticket
- Add items to the cart.
- Open the tickets: tap the folder icon in the cart (phone), or Tickets (bigger screen).
- Tap Save ticket.
- Type a Ticket name, for example a table number.
- Tap Save.
The new-cart button next to Charge also saves the cart as a ticket and starts an empty cart.
Open a ticket
- Open the tickets (folder icon or Tickets).
- Tap the ticket. Its items go back into the cart.
- Add more items or tap Charge.
To delete a ticket, tap the bin icon next to it.
If another register already charged or deleted the ticket, Charge stops with a message and nothing is charged. Check Transactions, then clear the cart.
#Send to customer (payment link)
Send the cart to a customer as one link. They see the items and the amount, pay on their own phone, and later see the receipt and delivery tracking on the same link.
When to use: orders from Facebook, Viber or phone calls.
- Add the items to the cart. Attach the customer if you know them.
- Tap the send icon in the cart header (Send to customer).
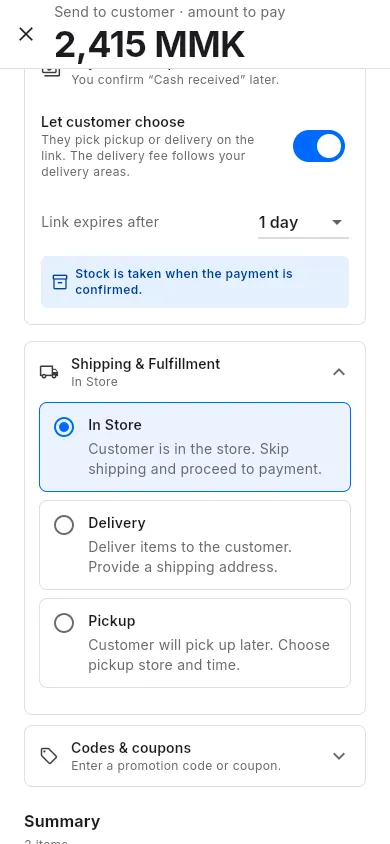
- Check Customer can pay by. QR payment is shown; cash shows only if the owner allows it.
- Leave Let customer choose on to let the customer pick pickup or delivery. Turn it off to set it yourself under Shipping & Fulfillment.
- Choose when the link expires in Link expires after.
- Tap Send payment link.
- Tap Share link (or SMS), and send it to the customer. They can also scan the QR on your screen.
- Tap New sale, Keep cart or Done.
When the customer pays, check the payment in Online orders → Payment links and tap Payment received. See Payment links.