Settings
Set up shops, stock locations, tax, checkout options, currency, receipts, the printer, language and help.
Settings has one list of categories: Business, Features (turn tools on or off, see Features), Checkout, Payments, Receipts & printers, Customers & offers, Repairs (when Repairs & service is on), Delivery, Online store, Team and App. On a phone, tap a category to open it, and tap the back arrow to return. Only the owner can open Settings.
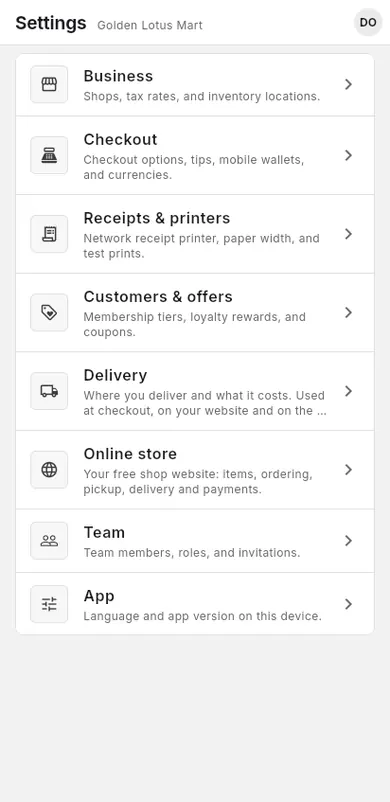
Some categories have their own pages: Payments, Delivery zones, Online store, Team and Membership tiers.
#Business details
Your business name and address print at the top of every receipt. Change them here when the business gets a new name or moves.
When to use: to fix a typo in the name, or when the name, address or tax ID changes.
- Open Settings, then Business.
- In Business details, tap Edit.
- Change the Business name, Address (optional) or Tax ID.
- Tap Save.
New receipts, reprints and new receipt links show the new name. A receipt link you already sent keeps the name it was made with.
#Shops
A shop is one place where you sell. Each shop has its own stock, sales and tax rate.
When to use: when you open a new branch, or to rename a shop.
- Open Settings, then Business.
- In Shops, tap Add shop. To change a shop, tap its pencil (Edit shop).
- Type the Name.
- Type the Default tax rate (%). Use 0 if you don't charge tax.
- Tap Save.
#Inventory locations
Locations are places inside a shop where you keep stock, such as a shelf, a back room or a warehouse.
When to use: when you want to know where batches of an item are kept.
- Open Settings, then Business.
- In Locations, pick the Shop.
- Tap Add location.
- Type the Name. If you want, type a short Code (optional).
- Leave Active on, and tap Save.
To stop using a location, edit it and turn off Active. See also Locations.
#Tax
LiteShop has one tax rate for each shop. It is added to every sale at that shop, after discounts. There is no tax setting per item.
When to use: when you must charge commercial tax, or when the rate changes.
- Open Settings, then Business.
- In Shops, tap the pencil (Edit shop) next to the shop.
- Change Default tax rate (%), for example 5.
- Tap Save.
The shop list shows the rate, for example "Tax: 5%". New sales use the new rate; old sales keep theirs.
#Checkout options
These switches change the checkout on this device only.
When to use: when you set up a new phone, tablet or computer for selling.
- Open Settings, then Checkout.
- In POS & inventory, turn Allow expired batches on if staff may sell expired stock after a warning.
- Turn Collect tips on to show tip buttons on the charge screen.
- Tap Mobile wallets to edit the wallet names staff can pick. Separate names with commas, then tap Save.
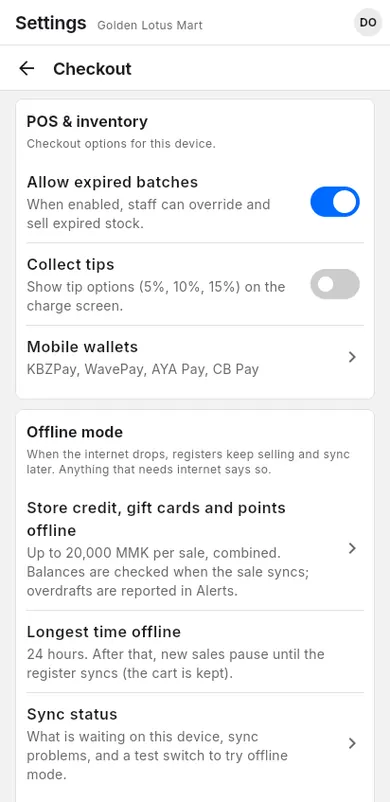
The same page has Offline mode settings. See Offline settings.
#Currency
The shop currency is used for prices, totals and reports, for example MMK. You can add other currencies with an exchange rate.
When to use: when you first set up, or when you price items in another currency.
- Open Settings, then Checkout.
- Find Currency.
- Check Shop currency. To change it, type the code (for example MMK) and tap Update base currency.
- To add another currency, tap Add currency.
- Type the Currency code (e.g., USD) and how much 1 unit is worth in your shop currency.
- Tap Save.
#How numbers and amounts show
There is no setting for number format. LiteShop shows amounts the same way everywhere.
When to use: read this if you are not sure how to type an amount.
- Amounts have a comma every three digits and the currency code after them, for example
100,000 MMK. - MMK has no decimals. Currencies like USD show two decimals only when needed, for example
12.50 USD. - When you type an amount, the commas appear by themselves. Type
100000and you see100,000. - You can type Myanmar digits (၀–၉). They change to
0–9. - You can paste an amount like
1,234 MMK. The extra text is removed.
#Receipts
Every sale gets its own private receipt link. It shows the shop, the items and the delivery status. You can also print a QR code of that link on paper receipts.
When to use: to let customers open their receipt on their phone.
- Open Settings, then Receipts & printers.
- In Receipt link, turn on Receipt link QR code.
Now every printed receipt ends with a QR code and a short link.
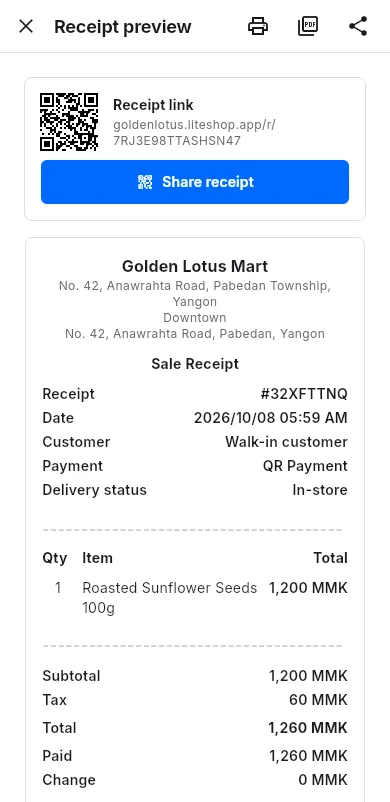
In Receipt design you can add your logo, your own text, contacts and QR codes to every receipt: see Receipt design.
#Receipt printer
LiteShop prints receipts on Bluetooth, network (Wi-Fi / cable) and Windows COM port receipt printers, or through the print dialog. Each device keeps its own printer.
When to use: when you connect a receipt printer to a new device.
- Open Settings, then Receipts & printers.
- In Receipt printer, tap the first row and choose how this device connects, for example Bluetooth printer on Android or Network printer (Wi-Fi / LAN).
- Choose the printer (or type its IP address) and tap Save.
- Choose the Paper width: 58 mm or 80 mm.
- Tap Test print.
You can also print automatically after each sale and open the cash drawer. All steps: Receipt printers. If a receipt doesn't print, see Printer problems.
#Language
The app can show English or Myanmar. The setting is for this device.
When to use: when a staff member prefers another language.
- Open Settings, then App.
- In Language, open App language.
- Pick English or Myanmar.
Staff who can't open Settings (managers and cashiers) change it from the account menu: tap your initials, then Language.
The app changes right away. The website language for customers is set in Online store, under What customers see.
#Help & learning
Help & learning opens this help site and controls the tips the app shows. You find it in two places: Settings → App, and the account menu (your initials at the top of the screen).
When to use: when you want to learn a feature, show a new cashier around, or see tips again.
- Open Settings, then App. Or tap your initials at the top and pick Help & learning.
- Tap Help center to open this site (edu.liteshop.app).
- Next to Welcome tour, tap Show to see the short introduction again.
- Turn Tips on new pages off if you don't want tips on screen. Turn it on again any time.
- Next to Reset tips, tap Reset to see all page tips again, also the ones you closed.
#Features
Features turns LiteShop's optional tools on or off, so the app shows only what your shop uses. A tool that is off is hidden for everyone — in the menus, at checkout, in Settings, Reports and Alerts. Nothing is deleted: turn it on again and everything is back.
When to use: when your staff see buttons your shop never uses, or when you start something new (for example selling online or by weight).
- Open Settings, then Features.
- Read the line under each tool. Tap Learn more to open its help page.
- Turn the switch on or off. When you turn a tool off, LiteShop tells you what changes; tap Hide.
The tools you can turn on or off, in the order Features shows them (23 tools in 5 groups):
| Group | Tool | What it hides when off |
|---|---|---|
| Selling | Credit book | Selling On credit, the Credit report and credit alerts. Customers who still owe keep their balance card, so you can still record their payments. See Credit. |
| Selling | Instalments | Pay monthly at checkout, the instalment fee setting, instalments in the Credit report and late-instalment alerts. Plans already made keep their schedule and you can still record payments. Needs Credit book (turning Instalments on turns it on too). See Instalments. |
| Selling | Gift cards | Selling gift cards and taking them at checkout. Balances are kept. See Gift cards. |
| Selling | Digital goods | Digital items at checkout and on your website, and the Digital goods page. Codes already sold are still delivered. See Digital goods. |
| Selling | Promotions & loyalty | Discounts, coupons, membership tiers and loyalty points. They stop applying at checkout and on your website. See Discounts. |
| Selling | Payment links | Send to customer. Links you already sent can still be paid. See Payment links. |
| Selling | Price lists | Price lists in Items, the item editor, the customer and the cart, and the price list report. Checkout charges retail prices; your lists and customer picks are kept. See Price lists. |
| Selling | Marketing | Marketing in Customers and its daily lists in Alerts. Campaign coupons already sent still work. See Marketing. |
| Selling | Repairs & service | Repairs in the menu, Settings → Repairs, the customer's Repair jobs card, repair alerts and the Repairs report. No new jobs can be taken in; jobs already taken in are kept. Off until you turn it on. See Repairs & service. |
| Selling | Appointments & bookings | Appointments in the menu, Settings → Appointments, the online booking page (/book on your website), the customer's Appointments card, booking alerts and the Appointments report. No new bookings; bookings already made are kept. Off until you turn it on (Plus and up). See Appointments & bookings. |
| Selling | Reseller portal | Resellers in the menu, Settings → Customers → Reseller portal, reseller alerts and Sales by reseller. Resellers can't place new orders but can still sign in to see and pay what they owe. Off until you turn it on. See Reseller portal. |
| Online & delivery | Online store & marketplace | Online orders, the website settings and sharing. Your website shows "This store is closed". See Online store. |
| Online & delivery | Delivery & zones | Delivery at checkout and on your website (pickup only). Courier COD is hidden too. See Delivery zones. |
| Online & delivery | Courier COD settlement | COD (courier) at checkout and Delivery companies. Needs Delivery & zones. See Courier COD. |
| Stock & buying | Batches & expiry | Expiry dates, batch stock and expiry alerts. See Batches and expiry dates. |
| Stock & buying | Transfers between shops | Transfer stock. See Transfers. |
| Stock & buying | Weighing scale | Scale settings and Sold by weight for new items. Items already sold by weight still ask for a weight. See Weighing scale. |
| Stock & buying | Barcode labels | Print labels and Generate missing barcodes. See Barcode labels. |
| Stock & buying | Supplier payables | Paying suppliers later and What I owe, unless you still owe a supplier. See Supplier payables. |
| Stock & buying | Reorder suggestions | The Reorder tab in Inventory and the weekly reorder alert. Purchase orders stay. See Reorder suggestions. |
| Stock & buying | Serial numbers & warranty | Asking for the IMEI / serial at checkout. Records and warranty dates are kept. See Serial numbers & warranty. |
| Team & devices | Time clock & commission | Clock in / out, timesheets and commission. People who are clocked in can still clock out. See Time clock. |
| Team & devices | Customer display | The second screen for customers. See Customer display. |
| Team & devices | Instant alerts | Push and Telegram alerts for this business. See Notifications. |
| Money | Business finance | Business finance (Ultra). Investors keep their own view. On by itself when your plan has it. See Business finance. |
#Simplify LiteShop
If your shop used LiteShop before Features existed, everything stays on. On Alerts (and in Settings → Features) LiteShop offers once: Simplify LiteShop? with the tools your shop has never used.
- Read the list of tools you haven't used.
- Tap Hide unused tools to turn them all off, or Choose in Settings to pick one by one, or Not now.
You can turn any tool on again later in Settings → Features.