Inventory
Check stock levels, adjust stock with a reason, count stock, move stock between shops, track batches and expiry dates, use storage locations and set low-stock alerts.
Inventory is how much of each item you have in each shop. This page shows how to check stock, fix it, count it and move it.
#Stock levels
The app lowers stock by itself when you sell, and raises it when you receive goods (and when a refund puts items back in stock).
When to use: you want to know how many units are left.
- Open Items.
- Pick the shop at the top (if you have more than one).
- Look at the Stock column. A Low or Out badge shows items that are running low or sold out.
- Tap an item to see more: Available stock, Low stock threshold and Expiry batches.
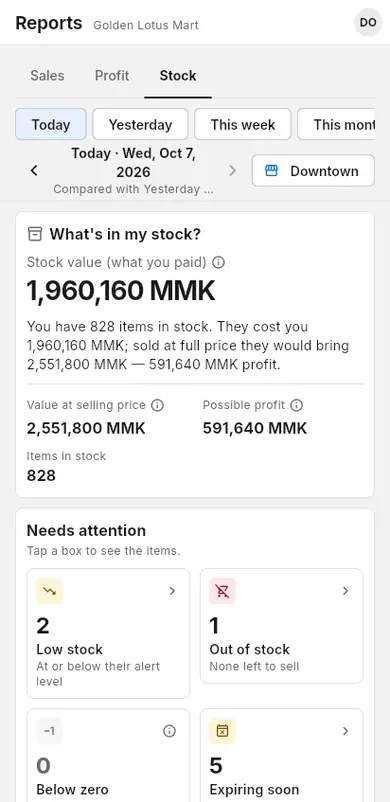
For a stock value report, open Reports and choose the Stock tab. See Stock report.
Phones and electronics can be tracked one by one by IMEI or serial number, with warranty: see Serial numbers & warranty.
#Adjust stock
An adjustment changes the stock of one item by hand. Every adjustment is saved with a reason, so you can see later why stock changed.
When to use: goods arrived without a purchase record, something broke or went missing, or the number on the screen is wrong.
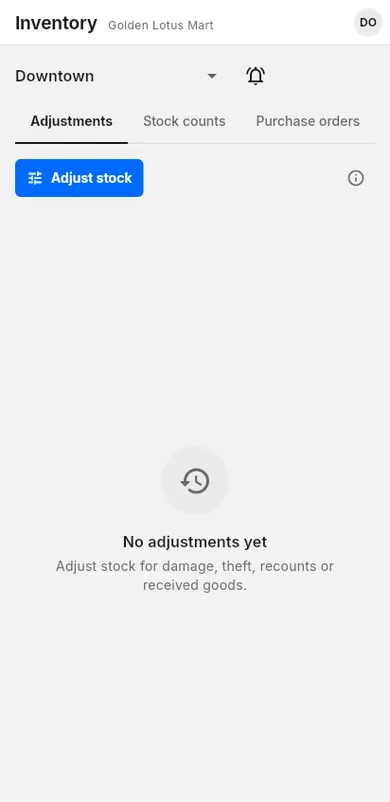
- Open Inventory.
- On the Adjustments tab, tap Adjust stock.
- Search for the item and choose it.
- Choose Add, Remove or Set to.
- Type the Quantity.
- Pick a reason, for example Received, Damaged, Theft, Lost, Return to vendor, Internal use or Recount.
- Add a Note (optional) if it helps.
- Tap Save.
The Adjustments tab lists every change with the reason, the person and the time.
#Damaged returns
Items a customer returns damaged (in a refund or a void) never go back on the shelf. They show at the top of Damage / loss history with Needs a decision.
- Open Items › ⋮ (More actions) › Damage / loss history.
- Tap the damaged item.
- Choose what happens to it, and how many: - Supplier: send them back for a Credit on account, Money back or a Replacement later. No stock moves; the return shows on the supplier like any return. - Write off: they are thrown away. The cost is already counted as a loss. - Sell cheaper: they go back on sale as a separate item, for example "Tea (damaged)", at the price you set. The normal item keeps its price.
- Tap the button to save. Part can go one way and the rest another; the record shows what is left to decide.
#Stock counts
A stock count compares what is really on the shelf with what the app thinks you have. When you finish, the app fixes the differences.
When to use: once a month, at the end of the year, or whenever numbers look wrong.
- Open Inventory and tap the Stock counts tab.
- Tap Start count.
- Give it a Name, for example "March count".
- Under Scope, choose All items or one category.
- Tap Start.
- For each item, count the shelf and type the number in Count. Use search to find items fast.
- Tap Not counted to see what is left.
- Tap Complete, check the differences, then tap Apply and complete.
Each counted item is set to the number you counted. Sales made while the count was open are not taken off a second time. Completing the same count again, or on another device, changes nothing.
#Transfers between shops
A transfer moves stock from one of your shops to another.
When to use: one shop has too much of an item and another shop needs it.
- Open Items.
- Tap ⋮ (More actions), then Transfer stock.
- Choose From shop and To shop.
- Tap Add Item and choose an item. If the item has variants, choose the Variant too.
- Type the Quantity.
- Add more items if needed, and a note if you want.
- Tap Transfer.
The stock moves with its batches: the other shop gets the same expiry dates and the same cost.
#Batches and expiry dates
A batch is a group of the same item with one expiry date, for example 20 bottles that expire in June. The app keeps stock per batch so you can see what expires first.
When to use: you sell food, medicine or anything else that expires.
Add batches when goods arrive
- Record the purchase (see Receive stock).
- On each item line, under Batch allocations, tap Add batch.
- Type the Batch qty.
- Tap Select expiry date and choose the date, or turn on No expiry.
- Choose a Location if you use storage locations.
Split stock you already have into batches
- Open Items and tap the item, then Edit item.
- Scroll to Batch stock.
- Tap Add batch, then set the quantity and expiry date.
- Tap Save.
The batch total cannot be more than the stock you have.
Expired batches appear in Alerts.
#Storage locations
Locations are places inside a shop, such as "Front shelf" or "Back store". You can say which location each batch is kept in.
When to use: you keep stock in more than one place and want staff to find it quickly.
- Open Settings, then Business.
- Under Locations, choose the Shop.
- Tap Add location.
- Type the Name and, if you like, a Code (optional).
- Tap Save.
Now you can pick the Location for each batch when you record a purchase or edit batch stock. See also Settings: locations.
#Reorder suggestions
The Reorder tab tells you what to order from each supplier, worked out from your sales: "Order 24 Coke this week". Make the purchase order in one tap.
When to use: once a week (or whenever a supplier visits), to order enough without running out or over-buying.
- Open Inventory and pick the shop.
- Open the Reorder tab. Items are grouped by the supplier you buy them from.
- Read the line under each item, for example Sells ~3.4 a day · 6 in stock · covers 14 days.
- Change a quantity if you want to order more or less.
- Tap Create purchase order on a supplier. A Draft order is saved with the supplier's prices (price breaks and free goods included). Tap Open to check it, then Mark as ordered.
How the number is worked out:
- Sales a day: the average of the last 28 days (today not counted). A new item counts from its first sale. An item that is out of stock stops counting at its last sale, so days it could not sell don't lower the average.
- What you need: sales a day × (the supplier's Lead time + Cover days) + safety stock. Safety stock is the item's low-stock alert level; without one, 3 days of sales.
- What you have: stock on hand − stock held for website orders and payment links − expired batches + what is still to arrive on draft or ordered purchase orders.
- Suggestion: what you need − what you have, rounded up to the supplier's Minimum order and Pack size (from the supplier price list).
Items sold by weight are suggested in kg (or their own unit). Items with variants are split so each variant ends up with about the same stock. Digital items, inactive items and items you marked Don't reorder are never suggested.
Who it is bought from: the supplier you choose with ⋮ → Buy from…, else the supplier of the last purchase, else the newest price list. Items without one are under No supplier yet.
Settings (the tune button on the tab): Cover days (14), Delivery days when a supplier has no lead time (3), Safety days (3), how many days of sales to average, the Weekly reorder alert (owners and managers get "12 items to reorder" on the day you pick; each person can turn it off in Notifications) and "To reorder" in the daily report. Don't reorder items are listed there too, with Suggest again.
Reorder suggestions are on the Plus plan and up. You can hide the tab in Settings → Features (Reorder suggestions).
#Low-stock alerts
A low-stock threshold is the number at which the app warns you. When stock falls to this number or below, the item shows as Low and appears in Alerts.
When to use: you want to reorder before an item runs out.
For one item (all shops)
- Open Items, tap the item, then Edit item.
- Under Inventory, type the number in Low stock reminder.
- Tap Save.
For one item in one shop
- Open Inventory.
- Tap the bell button (Low-stock alerts) at the top.
- Choose the Shop and the Item.
- Type the Low stock threshold.
- Tap Save Threshold.
The shop number is used first. If it is empty, the item's number is used.