Online store
Open your free shop website, choose items, set delivery and payments, and handle online orders and payment links.
Every shop can have a free website at yourname.liteshop.app. Customers see your items, order for pickup or delivery, pay, and follow their order. Orders come to Online orders in the app. Only the owner can change the online store settings.
#Set up your store
The setup takes about two minutes. Your store goes live as soon as you finish, and you can change everything later.
When to use: the first time you want to sell online.
- Open Settings, then Online store.
- If you have more than one shop, pick the Shop. Its items, stock and orders are used for this website.
- Under Choose your web address, type the name for your link. Use small English letters, numbers and dashes. The app tells you if the name is free.
- Under Choose items to show, pick All active items or I'll pick items later.
- Under Pickup or delivery, turn on Pickup, Delivery, or both. For delivery you can type one Delivery fee (same for every address). Use 0 for free delivery.
- Under How customers pay, choose the ways you accept. You can change them later in Settings → Payments.
- Tap Create my store.
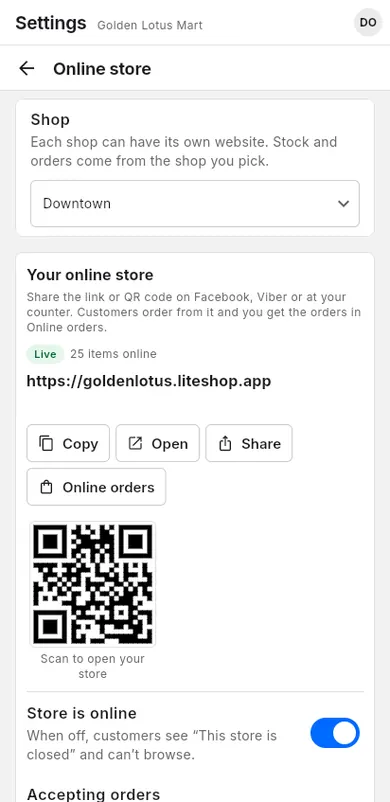
After setup, the same page has these parts: Store info (name, logo, banner, phone, address, opening hours), What customers see (how stock shows, categories, website language), Ordering, delivery and payment, Items and Web address. After a change, tap Save changes.
#Choose items to show
Only ticked items appear on your website. Prices, photos and stock come from your POS and update by themselves.
When to use: to add new items to the website or hide items you don't want to sell online.
- Open Settings, then Online store.
- Open Items and tap Choose items.
- Search or pick a category. Tick the items to show. Untick to hide.
- Tap Save and publish.
If something on the website looks old, open Items in the online store settings and tap Sync now.
#Share your store link
Customers open your store from a link or by scanning a QR code.
When to use: after setup, and whenever you post on Facebook, Viber or Telegram.
- Open Settings, then Online store.
- Find the Your online store card at the top.
- Tap Copy to copy the link, or Share to send it to an app.
- To print a QR code for your counter, take a screenshot of the QR under Scan to open your store.
You can also copy the link from Online orders with Copy store link.
#Delivery zones
Delivery zones decide where you deliver and what it costs. The same zones are used at checkout, on your website and on the marketplace.
When to use: when the delivery fee depends on the customer's township or distance.
- Open Settings, then Delivery.
- Pick the Shop.
- Turn on Offer delivery.
- Tap Add zone. Or pick a Quick start set, such as Nearby townships + rest of city.
- Type a Zone name.
- Under Who is in this zone, choose Areas (townships or whole cities), Distance (up to a number of km), or Everywhere else.
- Under How is the fee set?, choose Fixed fee and type the Delivery fee, or choose Use a delivery service.
- If you want, fill in Free delivery over, Minimum order and Delivery time.
- Tap Save.
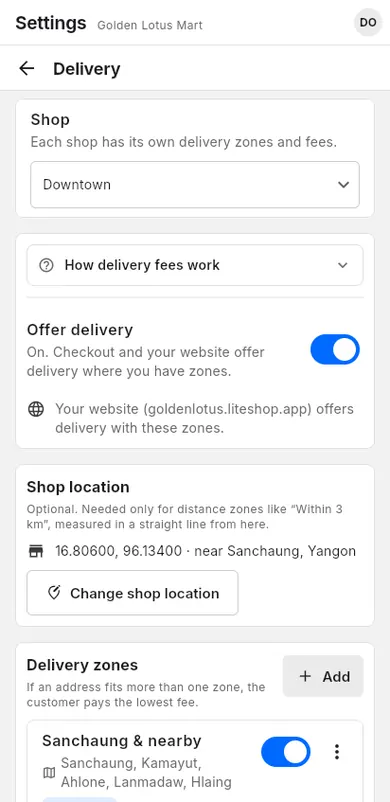
Distance zones need your shop's location. Tap Set shop location and pick your township, paste a Google Maps link, or use this device's location. To test your prices, use Check a delivery fee.
#Delivery companies and price lists
A delivery service is a courier or your own rider with a price list. A zone can use its prices instead of a fixed fee.
When to use: when you send orders with a delivery company and want customers to pay its real price.
- Open Settings, then Delivery.
- Go to Delivery services.
- To use a listed company, open it and tap Add to my shop.
- For your own rider or a courier not on the list, tap Add your own delivery service.
- Type the Name. Then tap Add price and choose where each price applies, its Price, Base weight and Each extra kg.
- If it charges them, fill in Pickup fee and COD fee (%).
- If the company has a tracking page, fill in Tracking link (optional).
- Tap Save.
- Edit a zone and choose Use a delivery service, then pick this service.
When you hand an order to the courier, record the tracking number. See Hand over to a delivery company.
#Payment options on the website
You choose how website customers can pay in one place: Settings → Payments. Each way to pay has an Online store switch. Customers pay you directly; LiteShop never touches the money.
When to use: to check what customers can use, or when you start or stop a way to pay.
- Open Settings, then Online store.
- Open Ordering, delivery and payment.
- Read Customers can pay with. It lists the ways to pay for pickup and for delivery.
- To change them, tap Change in Settings → Payments and use the Online store switches. See Ways to pay on your online store.
What customers see:
- At checkout they see only the ways to pay for the pickup or delivery they chose. Cash on delivery is for delivery orders, Pay at pickup for pickup orders.
- For Bank Transfer, Mobile Wallet, Card or Other, they see your instructions, for example your account number. After ordering, their order page shows Waiting for payment – {method} with the instructions again.
- If you turned on Ask for a payment screenshot, they can send a screenshot on their order page. It is checked like QR screenshots.
- When a delivery company collects the cash for you, Cash on delivery adds its COD fee (if the customer pays it) and names the courier. See Courier cash on delivery.
#QR payment on the website
Customers scan your QR code on the website and upload a screenshot of their payment. The screenshot is checked right away, before the order is placed.
When to use: when you want online customers to pay before you pack the order.
- Add your QR codes in Settings → Payments. Turn on Show on online store for each QR you want online. See Your QR codes.
- In the same place, turn on the Online store switch of QR Payment. See Ways to pay on your online store.
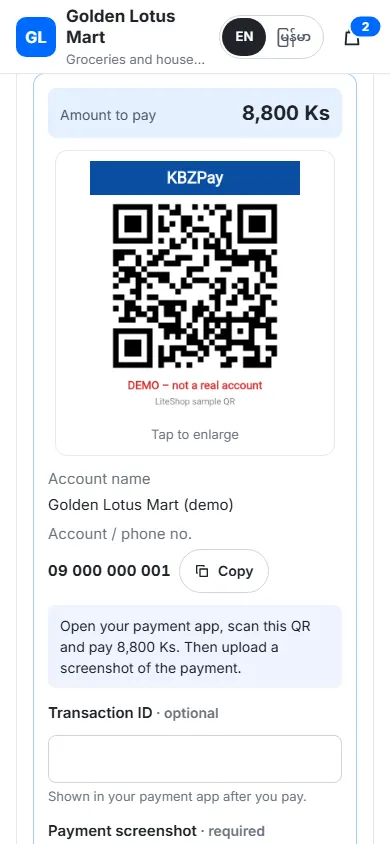
What the customer does:
- Opens your QR, pays the amount in their payment app.
- Uploads the payment screenshot. It is Required.
- Waits for the check. If it passes, they tap Place order.
If the amount is wrong, the screenshot was used before, or it isn't a payment, the customer must upload another one.
#Handle online orders
New orders appear in Online orders right away. You move each order through its steps, and the customer sees every change on their tracking page.
When to use: every time a new order comes in.
- Open Online orders.
- Make sure Website orders is selected at the top.
- Tap an order with the New status.
- Check the items and tap Accept order. Or tap Cancel order and choose a reason.
- When you start packing, tap Start preparing.
- For pickup, tap Ready for pickup. For delivery, tap Hand to delivery company and add the tracking number.
- To take payment at the counter, tap Ring up in checkout.
- When the customer has the order and has paid, tap Complete order. If you never rang it up, LiteShop asks first: Ring up records the sale and takes the stock; Complete without sale (stock unchanged) only closes the order.
If you see Website last synced …, no shop device has updated your website's stock for over an hour. Keep LiteShop open and signed in on a shop device (cashier accounts work too), or tap Sync now in Settings → Online store.
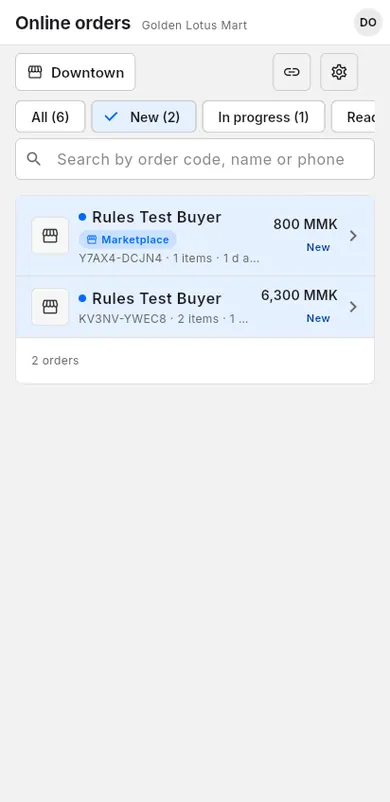
For a QR order, open the payment photo, check your banking app, tick I checked this payment in our banking app, then tap Payment received.
For a bank transfer, mobile wallet, card or other order, the order shows Waiting for payment – {method}, for example "Waiting for payment – Bank Transfer". When the money arrives, open the order, tap Payment received, check your banking app, tick I checked this payment in our banking app and confirm. If the customer sent a screenshot, it shows here with the check result.
When you ring up an order, the discount from Adjust total goes into the cart, and checkout picks the payment the customer chose (QR, bank transfer, mobile wallet, card or other), even if that method is off at the register. If today's prices or promotions give a different total than the order shows, the app tells you before you charge. A cancelled order, or one already rung up on another register, can't be charged again.
Tax: for Cash on delivery and Pay at pickup orders, the website shows your shop's tax (the Default tax rate (%) of the shop) before the customer orders, for example "Tax (5%)". The order total already has the tax you charge when you ring it up. QR, bank transfer, mobile wallet, card and other orders are paid at their own total, without tax.
Cancel reasons: the reasons in Cancel order reach the customer in their own language. You can add a note for the customer. Other reason shows your words as you type them.
Paid, then cancelled: after a customer sends a payment, their order page has no Cancel order button any more; it asks them to contact you (with your phone or chat buttons, or your shop's address when you have neither). If a paid order is cancelled anyway, Online orders shows Refund the customer, you get an alert, and the customer's page says you will refund them. Send the money back from your banking app and tell the customer.
Digital items only: an order of only digital items shows Digital instead of pickup or delivery. It has no ready or delivery step: after Start preparing, tap Complete order when the customer has their codes or items. Code items are checked against their unused codes, not your shop's stock, and the buyer's answers show with your question names (see Digital goods).
Bank transfer already received: if you tapped Payment received for a bank transfer, mobile wallet, card or other order, ringing it up doesn't ask for a payment photo again.
#Payment links in Online orders
Payment links you send from checkout are listed in Online orders too. Here you see who paid, check screenshots and confirm money.
When to use: after you sent a cart with Send to customer. See Send to customer.
- Open Online orders.
- Switch to Payment links at the top.
- Pick a filter, such as Payment sent, or search by customer, phone or item.
- Tap a link to open it.
- Check the screenshot and your banking app. Tick the checkbox and tap Payment received.
- If the customer chose cash, tap Cash received when you get the money.
- If the customer chose bank transfer, mobile wallet, card or other, the link shows Waiting for payment – {method}. When the money is in your banking app, tick the checkbox and tap Payment received.
The ways to pay on a link follow the Online store switches in Settings → Payments. See Payment link settings.
Other actions in the link panel: Extend 24 hours, Send again, Payment received (the customer paid cash at the shop; for QR they send the payment photo on the link), Hand to delivery company and Cancel link.
#Pre-orders
Send a payment link for items you don't have yet. The customer pays now, and you prepare the order when the stock arrives.
When to use: a customer wants to pay for items that arrive later, or the last ones are held for someone else.
- Send the cart with Send to customer. If the items aren't free, Not enough free stock opens.
- An owner or manager types a Reason, for example "New stock arrives on Friday".
- Optional: tap Expected ready and pick the day the order should be ready. The customer sees it.
- Tap Send as pre-order.
The customer sees Pre-order: we'll prepare it when the stock arrives and can pay by QR, cash or another method, like any link.
- The list and the link show Pre-order · waiting for stock, or Pre-order · Paid · waiting for stock once the customer sent the payment.
- New stock goes to pre-orders first, oldest first. When it arrives you get an alert Pre-order … can be prepared now, the link shows Ready to prepare, and the customer sees Your order is being prepared.
- Tap Payment received (or Cash received) after the stock has arrived. Before that you see Stock not here yet; an owner or manager can still ring it up with a reason.
- Cancelling a paid pre-order warns you to refund the customer.
#Fake screenshot guard
The customer gets 3 tries to send a correct payment screenshot. After 3 failed screenshots, the order or payment link is cancelled automatically.
When to use: read this so you know what happened when you see Fake payment screenshot.
A screenshot fails when the amount is wrong, it was used before, it is not a payment to you, or it does not look like a payment screenshot. The customer sees how many tries are left. When the customer only changes their area, pickup or delivery, or QR code, the same screenshot is checked again without using up a try.
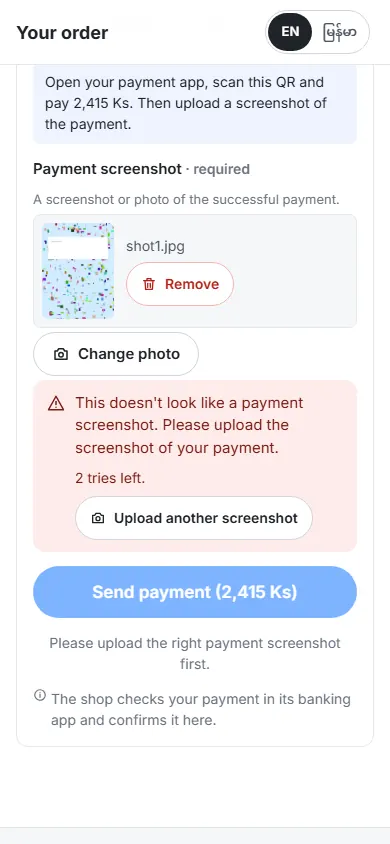
After the third failed screenshot:
- The order or link is cancelled and marked Fake payment screenshot.
- The customer is asked to contact the shop.
- An alert appears in Alerts under Fake payment screenshots. See Fake payment alerts.
If it was a real customer who made a mistake, you can give them another chance:
- Open the alert and tap Open, or find the order in Online orders.
- Read the screenshots and the history.
- Tap Reopen, then Reopen again to confirm.
- In Alerts, tap Mark reviewed.
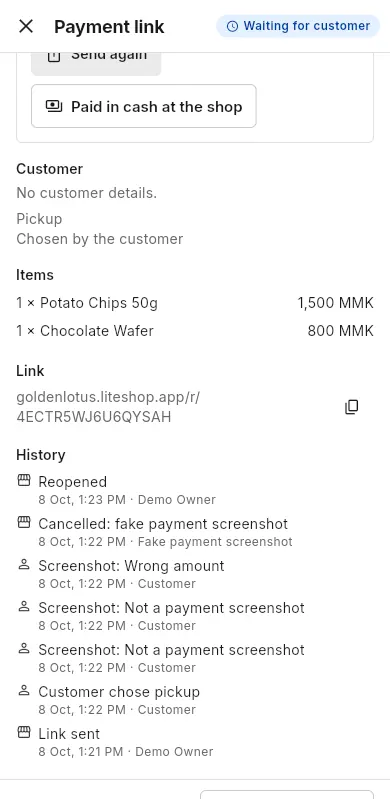
The customer gets 3 new tries. The old screenshots stay in the history.
#LiteShop Marketplace
The marketplace at store.liteshop.app shows items from many local shops. Listing your store is free and optional. Orders still come to Online orders, marked Marketplace.
When to use: when you want new customers who don't know your shop yet.
- Open Settings, then Online store.
- Find Also sell on LiteShop Marketplace.
- Turn on List my store on the marketplace.
- Choose your Store category, City and Township.
- Tap Save changes. Your items can take a minute to appear.
- Tap Preview to see your store on the marketplace.